Day 1 Recap:
Yesterday we covered the iGoogle page. Student’s set up their iGoogle start page that will serve as their yearlong daily planner. Students will start each class by logging into their
iGoogle page and discovering their dynamic daily agenda.
Also, students explored, researched, and presented new iGoogle widgets that would be an asset to the classroom. This activity allowed students to have ownership over the way they organize, communicate, and collaborate in this class.
Objectives:
- · Students will be able to create a Google Calendar
- · Students will be able to embed a Google Calendar
- · Students will be able to subscribe to a Google Calendar
Set up:
Day 2: Google Calendar
One of the widgets students will be using this year will be Google Calendar. As an Instructional Technology Specialist, one of my goals this year was to create school wide Google Calendars that would house our academic, sports, and events calendars. Also, it was my goal to have each teacher posting assignments and projects on classroom Google calendars. This would allow for students to subscribe to every school related calendar and house them in one central location.

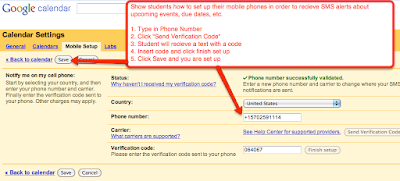
Google Calendars also allow students to access their schedules on their smart phone. In short, taking the time to set up a Google Calendar network will create organizational bliss and allow for effective communication throughout the school year.
The Process
1. Have students go to http://www.google.com/calendar
2. On the right hand side of the page students can log in with their gmail username and password. If your school has the Google Apps Education Suite, then instruct them to use that email address, however, if you do not have this option simply have them set up a gmail account.
3. Once students are logged into their Google Calendar allow them to get in small groups. You may choose to coordinate groups however you like. In their groups, allow students time to use Google Calendar without explaining anything to them about its functionality. Give them roughly ten minutes (Time will depend on the length of your class) to discover one element of Google Calendar that they can teach to the class. In order to avoid repeats have one representative from each group bring you a post it of what they will be teaching to the class. If there is a repeat lesson, have the group choose a backup.
3. Once the time is up, have student groups present what they have learned to the class. Have

the class take notes or follow along with each different lesson that is presented. Remind students that for
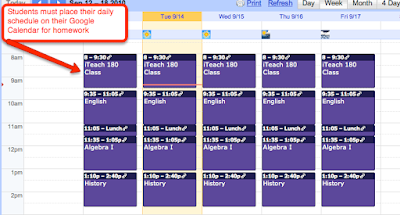
homework tonight they will have to set up their Google calendar and have it displayed with their class schedule.
4. Once presentations finish, depending on time, reflect on each student lesson and fill in any gaps with Google Calendar. If students did not figure out how to use “subscriptions” make sure you cover this.
NOTE: Later on in the year we will be setting up a class wikispace to house our presentations and lessons that both teacher and student deliver. You may want to record these lessons or simply have the students type up their process and then they can post them to the wiki. This way you can have sustainable resources from year to year.

Having a Google Calendar network present in your school, or even your classroom allows students, teachers, parents, and administration to access events in one central location.
If you would like further instructions on how to set up and maintain this calendar network in your class or school, please email me and I will provide resrouces.


